Hidden Wine Cellars: A 15 Percent Return on Investment for 2026 Homeowners
Homeowners seeking to enhance property value and personal enjoyment often overlook the potential of a hidden wine cellar. Such an addition can increase resale value by up to 15 percent, while providing secure storage, luxurious ambiance, and a discreet retreat. Properly executed, this feature combines advanced engineering with aesthetic appeal, ensuring both functionality and subtlety.
The following guide outlines a comprehensive approach to designing, constructing, and maintaining a hidden wine cellar. Each step emphasizes precision to maximize benefits and minimize risks.
Steps to Construct a Hidden Wine Cellar
1. Select an Optimal Location
Identify a space that maintains consistent cool temperatures and remains shielded from direct sunlight and mechanical vibrations. Basements offer the most suitable environment due to their natural insulation. Alternative options include crawl spaces, areas beneath staircases, or underutilized alcoves. Steer clear of proximity to laundry facilities, furnaces, or any sources of heat and moisture fluctuations.
2. Determine Dimensions and Entry Mechanism
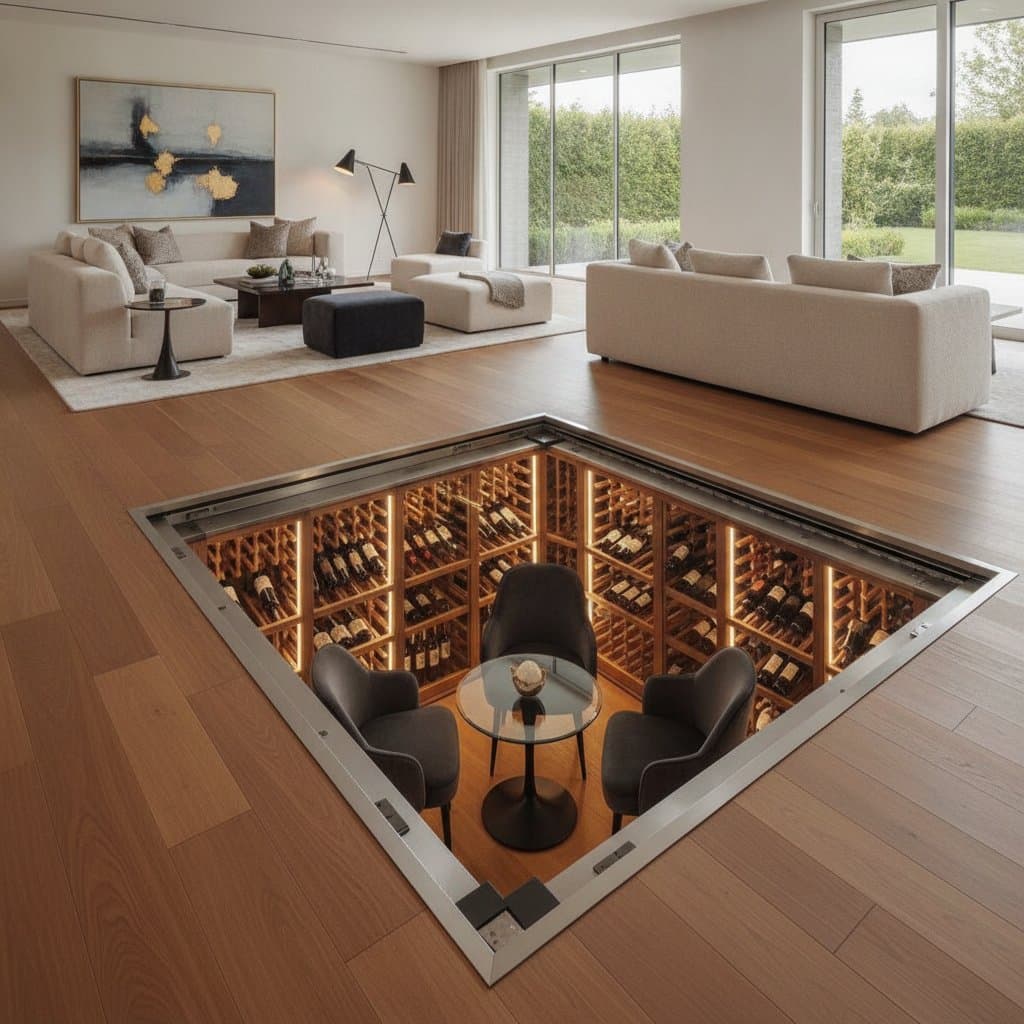
Assess the available area and calculate storage capacity based on your collection size, allowing for future expansion. For access, integrate a concealed entrance such as a pivoting bookcase, a seamless mirrored panel, or a retractable trapdoor equipped with a hydraulic lift. Prioritize mechanisms that ensure ease of use while maintaining security and blending with surrounding decor.
3. Establish Climate Control Systems
Incorporate a dedicated wine cooling unit or a ducted HVAC integration to sustain temperatures between 55 and 58 degrees Fahrenheit, paired with 60 percent relative humidity. Apply vapor barriers and high-density insulation to all surfaces, including floors, walls, and ceilings, to prevent condensation and energy loss. Monitor systems with automated sensors for real-time adjustments.
4. Erect the Enclosure Framework
Construct sturdy framing for walls and flooring using treated lumber or metal studs resistant to environmental stress. Seal all joints meticulously to eliminate air leaks. Install a robust moisture barrier prior to applying finishes such as mold-resistant drywall or natural stone veneers. Select hard surfaces like tile or sealed concrete for flooring to resist dampness accumulation.
5. Install Storage and Illumination
Opt for racks crafted from durable materials including modular metal, aromatic redwood, or polished mahogany, which naturally deter mold and warping. For lighting, deploy energy-efficient LED strips or recessed ceiling fixtures that emit cool, diffused light. Position all sources to avoid direct exposure to bottles, thereby preventing premature aging from heat or UV radiation.
6. Conceal the Access Point
Enhance intrigue by camouflaging the entrance with elements that harmonize with your home's architecture, such as a rotating bookshelf, a flush-mounted panel disguised as artwork, or a subtle floor hatch overlaid with matching hardwood or frosted glass. Focus on seamless integration to achieve an element of surprise without overt theatricality. Test the mechanism repeatedly for smooth, silent operation.
7. Validate Systems and Populate the Cellar
Operate the climate control for at least one week prior to introducing bottles, monitoring conditions with precision instruments. Verify stability through daily readings of temperature and humidity. Organize inventory by varietal, vintage, or geographic origin, using labeled modular shelving for efficient retrieval. Share the space selectively with guests to foster memorable experiences.
Project Timeline
Typical hidden wine cellar projects span four to eight weeks from initial planning to completion.
Design and permitting phase: 1 to 2 weeks
Active construction period: 2 to 4 weeks
Installation and testing of systems: 1 to 2 weeks
Elaborate customizations, such as automated lifts or transparent flooring, may extend the schedule. Simpler conversions in existing basements often conclude more swiftly, provided no structural modifications prove necessary.
Essential Tools and Materials
Tools
- Power drill and screwdriver set
- Electronic stud finder
- Precision level and measuring tape
- Utility knife for precise cuts
- Caulking gun for airtight seals
- Claw hammer for framing adjustments
- Digital moisture meter for inspections
Materials
- Rigid foam insulation boards (R-value 13 or higher)
- Polyethylene vapor barrier sheets
- Greenboard or cement-based drywall
- Modular metal or solid wood racking systems
- Dimmable LED light strips (cool white spectrum)
- Through-the-wall cooling unit (sized for space volume)
- Pivot hinges and locking hardware for concealed doors
Select all components certified for high-humidity environments. Refrain from using untreated lumber or conventional gypsum board, as they degrade rapidly.
Considerations by Region
Adapt construction techniques to local environmental challenges.
- In cold climates: Bolster insulation layers and install heated subfloors to mitigate frost-induced condensation.
- In humid areas: Reinforce vapor barriers and integrate a secondary dehumidification unit as backup.
- In arid regions: Incorporate a misting humidifier to preserve cork integrity and prevent bottle drying.
- In coastal locations: Employ stainless steel or galvanized hardware to resist salt corrosion.
Building regulations differ by jurisdiction, particularly regarding basement alterations. Many locales mandate emergency egress windows or dedicated ventilation. Consult authorities early to secure approvals before commencing work.
Engaging Professional Expertise
Seek assistance from qualified contractors or interior designers at the outset if your project involves complex elements. Indicators include existing basement dampness, requirements for motorized access, integration with central HVAC, or aspirations for premium finishes.
Professionals excel in orchestrating cohesive designs that encompass custom millwork, ambient lighting, and flawless concealment. Specialized HVAC technicians guarantee vibration-free operation, safeguarding wine quality while ensuring energy efficiency.
Investment Return and Upkeep Strategies
Investing in a high-quality hidden wine cellar typically yields a 15 percent uplift in home resale value, particularly when employing superior materials and craftsmanship. Annual maintenance remains modest, contingent on consistent environmental controls.
Routine maintenance tasks:
- Monitor humidity levels monthly using integrated gauges.
- Replace or clean cooling unit filters biannually.
- Examine seals and insulation integrity each year.
- Apply protective sealants to wooden elements as wear appears.
Equip the cellar with a wireless digital thermometer and hygrometer for remote oversight. Annual battery replacements ensure uninterrupted functionality. Diligent care sustains both the collection and the infrastructure over decades.
Strategies for Optimal Results
- Anticipate expansion: Allocate 20 percent excess capacity in racking to accommodate growing collections.
- Minimize disturbances: Mount compressors on anti-vibration pads to protect sediment in aging wines.
- Ensure airtight integrity: Caulk every seam, as minor breaches compromise climate stability.
- Maintain equilibrium: Limit door openings to prevent thermal fluctuations that stress wines.
- Enhance visibility thoughtfully: Combine ambient low-level LEDs with adjustable spotlights to highlight prized bottles without excess illumination.
A hidden wine cellar embodies meticulous engineering and refined elegance. Precision in every detail unlocks its full potential as a valuable asset and personal sanctuary.
Frequently Asked Questions
How much does a hidden wine cellar cost? Expenses range from $10,000 for basic installations to $50,000 or more for custom designs with advanced features. Factors include size, materials, and climate systems.
Does a wine cellar require special permits? Yes, in most areas, structural changes to basements necessitate building permits. Verify local codes for electrical, plumbing, and safety compliance.
Can I convert an existing closet? Absolutely, provided it meets climate criteria. Reinforce insulation and add dedicated cooling to transform it effectively.
What if my home lacks a basement? Consider under-stair spaces or custom room additions. Ground-level conversions demand superior insulation to mimic subterranean conditions.
How do I choose the right cooling system? Calculate based on cubic footage; split systems suit larger spaces, while through-wall units work for compact areas. Prioritize quiet, energy-efficient models.
Realizing Your Vision
Embark on this project with a clear blueprint and expert input to ensure seamless execution. The result extends beyond storage: it elevates daily living and positions your property as a standout in competitive markets. Begin by sketching your ideal layout today.