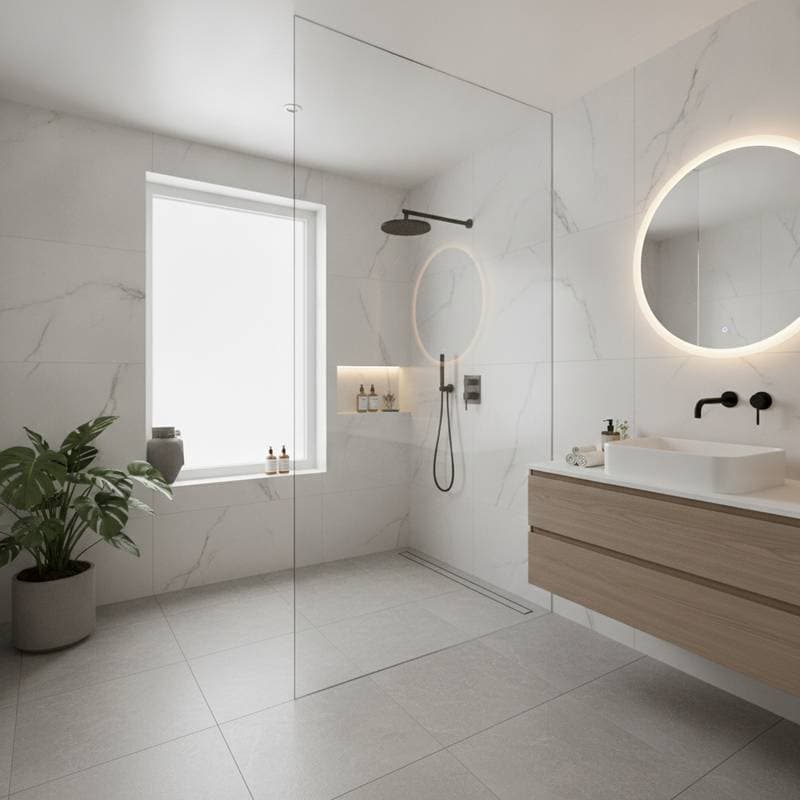
Wet Rooms Deliver Higher Resale Value
Typical return: 11 percent higher resale value, with project costs from 9000 to 18000 dollars per bathroom.
Removing a dated tub and installing a zero-threshold wet room converts a standard bath into a high-access space that appeals to many buyers. The upgrade improves function, safety, and style while simplifying maintenance.
Project Snapshot
| Category | Details |
|---|---|
| Cost Range | 9000 to 18000 dollars for a full conversion |
| Timeline | 2 to 4 weeks, depending on permits and tile supply |
| Lifespan | 20 plus years with proper waterproofing |
| Best Season | Spring and early fall for faster scheduling |
| DIY Friendly | Partial only. Waterproofing and tile work need pro oversight. |
Cost Factors
Materials such as tile, waterproof membranes, and drainage systems account for most expenses. Plan on 4 to 10 dollars per square foot for tile and 300 to 600 dollars for the linear drain system.
Professional installation costs 60 to 100 dollars per hour. Skilled labor remains essential for creating proper slopes and achieving reliable seals.
A compact 5 by 8 foot bath costs less to convert than a master suite. Larger areas require more tile and extended preparation time.
Relocating drains or expanding the shower footprint adds 800 to 2000 dollars. Wall reframing increases the budget further.
Many regions require a waterproofing inspection before tile installation. Permit fees range from 150 to 400 dollars.
Conversion Options
Basic conversions keep existing plumbing in place, use large-format porcelain tile, and feature a simple glass panel or open design.
Midrange upgrades include heated floors, frameless glass enclosures, and textured tile for improved slip resistance.
Premium wet rooms incorporate custom drainage and lighting, integrated benches or niches, and designer fixtures with natural stone finishes.
Installation Steps
- Demolish the old tub and wall tile.
- Prepare the subfloor and create a slope toward the drain.
- Apply a waterproofing membrane to all surfaces.
- Install tile and apply sealant.
- Mount fixtures and glass panels.
- Complete final inspection and waterproof testing.
When to Hire Professionals
Homeowners can safely handle demolition, debris removal, painting, and light fixture replacement. Professionals must manage slope setting, drain base installation, waterproofing membrane application, and tile or glass work.
Errors in slope or sealing produce leaks and structural damage. Such issues may void insurance coverage. Engage a licensed tile or plumbing contractor for these critical steps.
Scheduling and Budget Planning
Expect a 2 to 4 week timeline due to drain and tile lead times. Order materials early to prevent delays. Winter scheduling can reduce labor costs by 5 to 10 percent. Some localities provide rebates for water-saving fixtures.
Reserve an additional 10 to 15 percent of the budget for hidden subfloor damage or plumbing adjustments. These conditions appear frequently in older homes.
Ongoing Care
Seal grout every two years. Use non-acidic cleaners to protect tile and membranes. Certified installations often include 10-year warranties on waterproofing systems. Replace silicone joints when they yellow or crack.
Preparing for the Project
Inspect floor structure for moisture damage before work begins. Obtain two or three quotes from licensed remodelers experienced with wet rooms. Confirm warranty coverage on waterproofing and tile installation. Schedule early in the season to avoid contractor backlogs. Maintain a reserve fund for finish upgrades that enhance resale appeal.
A properly constructed wet room improves comfort, safety, and modern appeal. Buyers value accessibility and clean design, which supports the observed resale premium.