Swap Tubs for Wet Rooms: 11% Value Boost in 2026
Direct Answer:
Replacing a traditional bathtub with a wet room can increase your home resale value by approximately 11 percent. This upgrade introduces luxury, accessibility, and contemporary design elements that attract modern buyers. Projects typically range from $9,000 to $18,000 and require two to three weeks, covering demolition through final tiling.
How to Plan a Tub-to-Wet-Room Conversion
Step 1: Confirm Feasibility
Examine the subfloor structure before beginning work. Wet rooms demand a precise slope and comprehensive waterproofing membrane. Properties with slab foundations or shallow subfloors often need modifications to accommodate these requirements.
Consult a licensed plumber or contractor for an inspection if uncertainties arise. Professionals assess drain positioning, joist intervals, and ventilation compatibility to determine project viability.
Step 2: Choose Layout and Drain Type
Opt for a linear drain positioned along one wall to achieve a streamlined appearance, particularly in compact areas. A central drain offers a conventional option and generally incurs lower costs.
Determine placements for glass panels or dividers. Some designs eliminate barriers for an expansive, open atmosphere, while others incorporate a single glass enclosure to minimize water splash.
Step 3: Waterproofing
Prioritize this phase as the foundation of durability. Apply tanking to seal the floor and lower walls with a robust waterproof membrane. Secure all joints, corners, and pipe entries meticulously.
Select a certified system compatible with your chosen tiles and subfloor composition. Compromises in this area result in leaks and mold growth over time.
Step 4: Tile Installation
Select slip-resistant porcelain or textured stone tiles for safety. Larger formats reduce grout lines and enhance the seamless aesthetic. Employ epoxy grout to bolster resistance against moisture and wear.
Step 5: Fixtures and Finishing
Incorporate wall-mounted fixtures to maintain an unobstructed floor for simplified cleaning. Install a rainfall showerhead for indulgent experiences or a handheld unit for versatile use. Underfloor heating provides warmth and accelerates drying.
How Long It Takes
Expect a standard conversion to span two to three weeks.
- Days 1-3: Complete demolition, remove debris, and inspect the subfloor.
- Days 4-8: Install plumbing and configure the drain system.
- Days 9-11: Apply waterproofing and allow curing time.
- Days 12-18: Lay tiles, mount fixtures, and fit glass elements.
- Days 19-21: Cure grout, perform cleanup, and conduct final checks.
Anticipate potential delays from material deliveries, such as tiles or bespoke glass. Procure supplies in advance to adhere to the schedule.
Tools and Materials Checklist
Tools
- Utility knife and pry bar for demolition
- Level and laser level for establishing slope
- Trowels and tile spacers
- Wet saw for precise cuts
- Drill with mixing paddle
- Caulk gun for sealing
Materials
- Waterproof membrane or liquid tanking kit
- Thinset mortar and epoxy grout
- Tiles and matching trim pieces
- Drain assembly components
- Shower valve, head, and glass panels
- Sealants and backer board
Acquire surplus tiles for eventual replacements. Retain product documentation for warranty purposes.
Regional and Climate Considerations
Cold Climates
Integrate heated flooring and adequate insulation to ensure year-round comfort. Focus on measures to manage condensation effectively.
Humid Regions
Incorporate anti-microbial grout paired with a high-capacity exhaust fan. Choose tiles engineered to withstand mold and mildew.
Coastal Areas
Select marine-grade or stainless steel hardware to resist corrosion from salt exposure.
Frost-Line Regions
Insulate plumbing lines in exterior walls to safeguard against freezing temperatures.
Costs fluctuate by location. Urban and coastal markets command higher labor rates, while material expenses vary with availability and transport.
Design Choices That Add Value
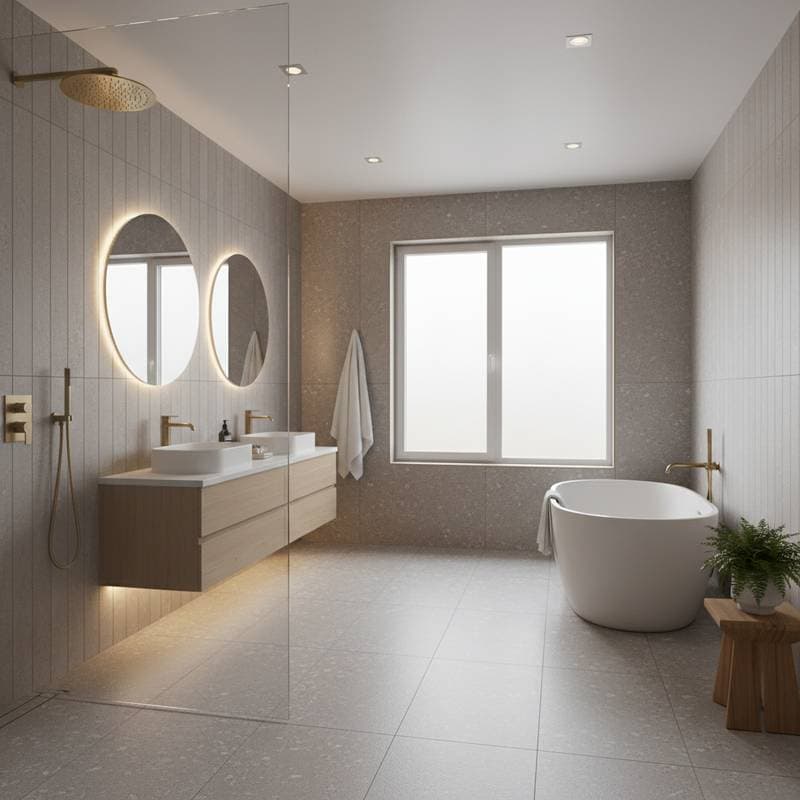
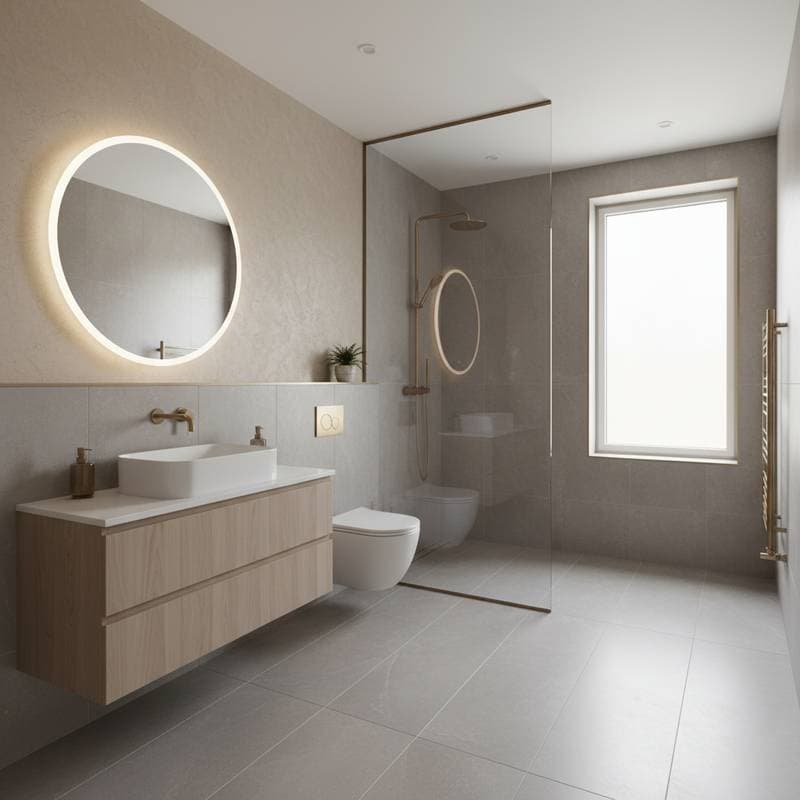
1. Curbless Entry
A level floor transition without thresholds delivers a modern, fluid appearance and enhances accessibility. This feature accommodates children, seniors, and individuals with mobility limitations.
2. Frameless Glass
This option expands perceived space and facilitates light distribution. Transparent panels maintain a minimalist profile, whereas frosted variants provide seclusion.
3. Hidden Drain Systems
Concealed linear drains beneath wall tiles yield a sophisticated, resort-inspired finish. Although pricier, they elevate the overall luxury.
4. Contrasting Tile Zones
Delineate the shower area with pale wall tiles against darker floor options. This contrast directs water flow and mitigates slip hazards.
5. Floating Vanities
These suspended units preserve floor openness for effortless maintenance and amplify spatial perception.
6. Built-in Niches
Recessed storage compartments organize essentials neatly, preserving the pristine lines of the design.
Why Buyers Pay More for Wet Rooms
Accessibility
Barrier-free designs support users across life stages. Prospective owners value adaptations that enable aging in place without major alterations.
Style
Wet rooms align with current minimalist aesthetics. Their photogenic quality enhances real estate marketing materials.
Maintenance
Eliminate the need to clean trays or curtains. Well-constructed wet rooms facilitate rapid drying and deter mold accumulation.
Efficiency
Discarding the tub reclaims valuable square footage, transforming cramped bathrooms into more generous environments.
Sustainability
Pair with low-flow showerheads and optimized drains to conserve water. This approach reduces consumption and utility expenses.
These attributes position wet rooms as a compelling investment, blending opulence with utility for enhanced market desirability.
Common Mistakes to Avoid
- Neglecting Slope Verification. Direct water toward the drain to prevent stagnation in low spots.
- Employing Standard Drywall. Substitute with cement board or moisture-resistant backer materials.
- Selecting Glossy Floor Tiles. Opt for textured surfaces to avoid hazards when wet.
- Overlooking Ventilation. Inadequate airflow fosters mildew development.
- Underbudgeting Expenses. Account for custom elements like drains, glass, and trim that accumulate costs.
Allocate a 10 percent buffer in your budget for unforeseen issues. Thorough planning minimizes disruptions.
Maintenance Tips
Wipe surfaces immediately after use to prevent buildup. Reapply grout sealant every six to twelve months. Inspect for cracks or shifting tiles periodically.
Clear drains routinely to avoid blockages. Employ mild, non-acidic cleaners to preserve grout integrity and waterproof layers.
Regular upkeep sustains the system's performance for years.
When a Tub Still Makes Sense
Retain a bathtub in homes where soaking remains a priority, such as for families with young children. Preserve at least one tub if multiple bathrooms exist to broaden buyer appeal.
| Situation | Recommendation | Rationale |
|---|---|---|
| Single Bathroom Home | Retain the tub | Preserves versatility for diverse buyers |
| Multiple Bathrooms | Convert one to wet room | Offers luxury alongside traditional options |
| Aging in Place | Install curbless wet room | Simplifies access and upkeep |
| Rental Property | Pursue partial conversion | Streamlines ongoing maintenance |
Pro Tips for Success
Pre-establish the floor slope prior to waterproofing for uniform drainage. Engage a single tile specialist throughout to ensure uniform seams.
Verify waterproofing integrity by flooding the base and monitoring for seepage before tiling. Measure for custom glass post-tiling for precision.
Incorporate LED strips in niches for ambient, spa-inspired illumination without introducing excess humidity.
These refinements distinguish an ordinary renovation from an exceptional one.
Quick FAQ
Do wet rooms always increase home value?
In most cases, yes. Quality construction and premium finishes contribute about 11 percent to resale value.
Can a small bathroom accommodate a wet room?
Absolutely. A 5x7 foot area suffices with efficient layout and accurate sloping.
Is a special permit required?
Plumbing permits apply in most jurisdictions. Verify regulations with local authorities prior to commencement.
Will water spill into the bathroom?
Proper sloping, drainage, and enclosure placement prevent this. Expert waterproofing eliminates leak risks.
What constitutes the most economical wet room build?
Retain the existing drain location, select ceramic tiles, and forgo bespoke glass.
Is installation feasible on a concrete slab?
Yes, though sloping may involve cutting or recessing. Seek professional guidance for optimal methods.
Execute Your Wet Room Upgrade
Initiate the process by scheduling a feasibility assessment with a qualified professional. Gather materials promptly to align with your timeline. This strategic conversion not only elevates daily comfort but also secures substantial returns upon sale.