Transition from Tubs to Wet Rooms: Achieve an 11% Resale Value Increase by 2026
The average cost for this upgrade totals $14,000, delivering approximately 11 percent higher returns in contemporary housing markets.
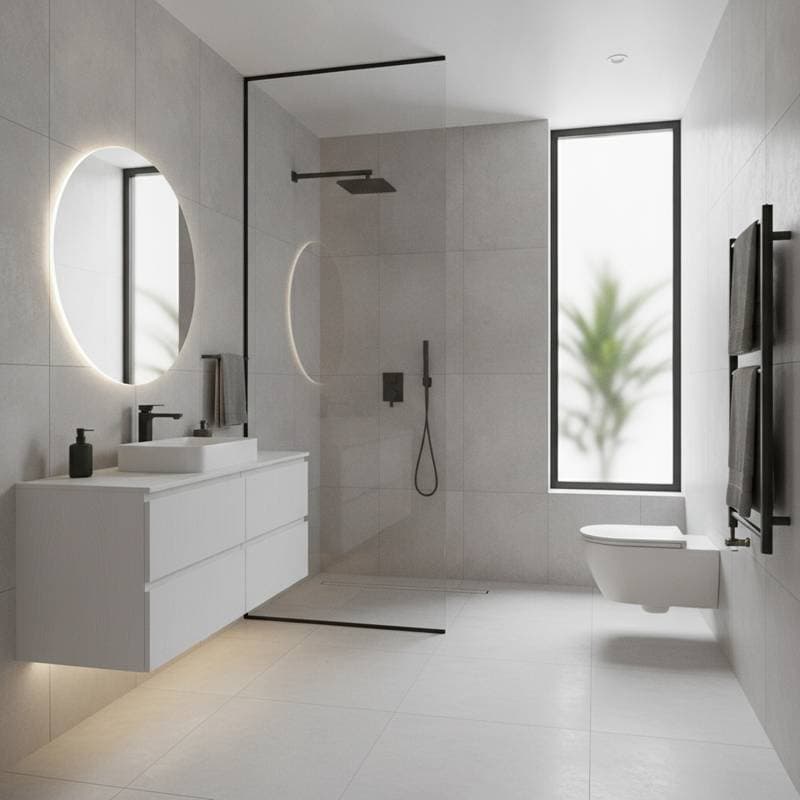
A wet room eliminates the need for a separate bathtub and enclosed shower, creating instead a fully integrated, waterproof area that blends seamlessly with the bathroom. This design choice maximizes space in compact layouts, enhances mobility for users with limited physical ability, and simplifies daily upkeep through its smooth, uninterrupted surfaces. As preferences evolve toward open-concept bathing spaces without barriers, the financial upside of this renovation grows, particularly for properties targeting younger buyers or those prioritizing universal design principles.
Homeowners increasingly select wet rooms for their ability to modernize outdated bathrooms while addressing practical concerns like slip resistance and efficient water management. Professional installers emphasize that proper execution not only prevents common pitfalls such as water seepage but also aligns with building codes that favor durable, low-impact features. By 2026, market analyses project this upgrade will outperform traditional tub replacements in resale scenarios, especially in urban and suburban areas where space efficiency commands a premium.
Key Benefits of Wet Room Installation
Before delving into expenses, consider the advantages that justify the investment. Wet rooms promote an inclusive environment, accommodating wheelchairs or walkers with their level-entry access and absence of curbs. Cleaning becomes straightforward, as water flows directly to integrated drains, reducing the accumulation of soap scum or mildew in hidden corners.
From an aesthetic standpoint, these spaces allow for creative material selections, such as large-format tiles that minimize seams and evoke a spa-like serenity. Energy efficiency improves with optional additions like heated floors, which pair well with the room's insulated waterproof layers. Overall, the shift from a tub-centric setup to a wet room fosters a sense of luxury and foresight, appealing to discerning buyers who seek homes built for the future.
Detailed Cost Breakdown
Understanding the components of a wet room renovation helps in budgeting accurately. Costs vary based on bathroom size, material quality, and regional labor rates, but a standard 60-square-foot space provides a reliable benchmark.
1. Waterproofing System
The foundation of any wet room lies in its waterproofing, which typically ranges from $2,000 to $4,000. This includes applying specialized membranes to floors and walls up to a height of six feet, ensuring complete enclosure against moisture intrusion. Materials like liquid-applied polyurethane or sheet membranes create a barrier that withstands constant exposure; professional application guarantees adhesion and seam sealing, averting issues like efflorescence or structural weakening over time.
Neglecting this step leads to severe consequences, including subfloor deterioration and health hazards from mold growth. Certified products often integrate antimicrobial agents, extending the system's longevity and compliance with local health standards.
2. Tile and Stone Finishes
Surface materials account for a significant portion of the budget, with ceramic tiles beginning at $5 per square foot and premium options like porcelain or natural stone reaching $20 per square foot. Larger tiles reduce the number of grout lines, which in turn lowers maintenance demands and enhances the visual flow of the space.
Selection influences both durability and style: porcelain resists stains and scratches effectively, while stone adds a high-end texture that elevates the room's ambiance. Factor in underlayment for soundproofing and thermal properties, which can add $1 to $3 per square foot without compromising the waterproof integrity.
3. Plumbing Adjustments
Modifying plumbing elements costs between $1,000 and $2,500, depending on the existing setup. This covers repositioning drains to accommodate a linear trench or point drain, ensuring a gentle slope of one-quarter inch per foot for optimal water runoff.
Precision here is essential; improper sloping results in ponding, which accelerates wear on finishes and invites bacterial buildup. Licensed plumbers verify connections to prevent backflow, often incorporating anti-siphon valves for added safety. In homes with cast-iron pipes, upgrades to PVC may incur extra fees but yield long-term reliability.
4. Glass Panels or Partitions
Frameless glass enclosures range from $800 to $1,500, providing a subtle division if full openness feels too exposed. Tempered glass with clear or frosted finishes maintains light flow while containing splashes during use.
Many opt for no partitions to emphasize the room's expansive feel, relying instead on the waterproofing to manage water direction. Custom etching or etching films offer privacy without obstructing views, and easy-clean coatings reduce spotting from hard water.
5. Labor and Disposal
Labor charges span $80 to $120 per hour, encompassing demolition, surface preparation, and final assembly. For a typical project, this equates to 40 to 60 hours of work, plus disposal fees for old fixtures and debris.
Older properties may require additional reinforcement of subfloors, inflating costs by 10 to 15 percent. Efficient crews coordinate with waste management services to recycle metals and tiles, minimizing environmental impact and landfill contributions.
DIY Considerations Versus Professional Installation
While certain tasks suit skilled homeowners, others demand expert intervention to avoid complications.
Suitable DIY Elements
Experienced individuals can manage demolition by carefully prying up tiles and removing the tub, always prioritizing safety with protective gear such as gloves, safety goggles, and a dust respirator. Painting adjacent walls and laying basic tile in non-critical areas falls within reach, provided tools like wet saws and levels are on hand.
Water supply isolation precedes any plumbing disturbance; testing for leaks post-reassembly confirms integrity. Document the process with photos to reference during inspections or future sales disclosures.
When to Engage Professionals
Entrust waterproof membrane installation and drain placement to certified experts, as these steps require specialized tools and knowledge of building codes. Subfloor leveling and slope creation prevent uneven drainage, a common failure point in amateur attempts.
Permits become necessary for plumbing alterations; professionals handle filings to ensure approval. Signs of underlying moisture damage, such as soft spots or discoloration beneath existing flooring, signal the need for immediate professional assessment to mitigate risks of rot or electrical hazards.
Substandard work not only invalidates manufacturer warranties but also diminishes the anticipated resale premium. Investing in vetted contractors through references or licensing boards secures quality and peace of mind.
Project Timeline and Cost-Saving Strategies
Anticipate a duration of two to four weeks, influenced by material procurement and drying periods. Secure drains and membranes early, as supply chain variability can extend waits by days.
Commence demolition only after deliveries confirm, avoiding idle periods that inflate labor expenses. Pair the wet room with water-efficient fixtures to access rebates in qualifying areas, potentially offsetting 5 to 20 percent of costs through utility incentives.
Repurpose salvageable elements like vanities or lighting to cut expenses further. Phased approaches, such as completing waterproofing before holidays, align with seasonal labor availability and reduce rush surcharges.
Ongoing Maintenance and Warranty Essentials
Preserve the installation's performance through routine care. Reapply sealant to grout joints and stone edges every two to three years, using silicone-based products suited to wet environments.
Prevent drain blockages by installing mesh screens and flushing with enzymatic cleaners monthly. Annual inspections reveal hairline cracks in grout or membranes; address them promptly with epoxy fillers to forestall water infiltration and subsequent repairs.
Reputable waterproofing carries 10-year warranties when executed by authorized installers, often including coverage for labor on defects. Retain documentation of the installation process, including material specs and certification proofs, for warranty claims or home appraisals.
Steps to Launch Your Wet Room Project
Start by measuring the bathroom dimensions and drafting a preliminary layout that incorporates a unified drainage gradient. Solicit quotes from at least two licensed contractors, inquiring specifically about their preferred membrane technologies and past project portfolios.
Evaluate warranty terms and insist on third-party verification of waterproofing efficacy prior to tiling commencement. Consult local codes for accessibility features if planning to age in place, ensuring the design supports future adaptations.
This renovation stands as a strategic choice for enhancing daily comfort, broadening market appeal, and securing tangible financial returns through improved property valuation.