Transitioning from Tubs to Wet Rooms: The Premier Value-Enhancing Bathroom Upgrade for 2026
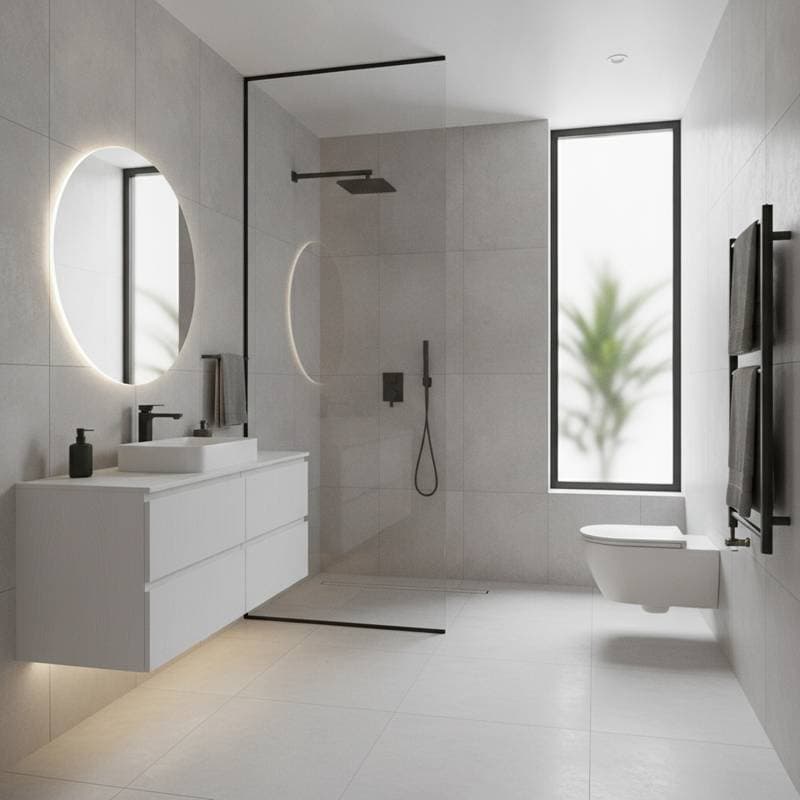
Wet rooms represent a significant shift in bathroom design, offering a seamless, waterproof environment that eliminates the need for traditional shower enclosures or bulky bathtubs. This trend gains prominence in 2026 as homeowners seek modern, accessible spaces that enhance daily functionality and overall property appeal. By integrating curbless showers and open layouts, wet rooms provide a spa-like experience while addressing practical concerns such as mobility and maintenance.
The investment typically ranges from $9,000 to $20,000, influenced by factors like bathroom size, material selections, and regional labor costs. Professional installation generally requires one to two weeks, ensuring compliance with building codes and optimal waterproofing. Homeowners who undertake this upgrade often report increased satisfaction with their living spaces, alongside potential boosts in resale value.
Essential Steps for Converting a Tub to a Wet Room
Converting an existing bathtub area into a wet room demands careful planning to achieve a durable, leak-free result. Begin by evaluating the space to determine the scope: a full-room wet design or a designated shower zone with surrounding dry areas. Consult with a licensed contractor early to assess structural integrity and plumbing feasibility.
-
Develop a detailed layout plan. Measure the bathroom precisely and sketch the new configuration. Consider traffic flow, fixture placement, and accessibility features like grab bars for universal design.
-
Demolish and inspect the existing setup. Carefully remove the bathtub using appropriate tools to avoid damaging surrounding structures. Examine the subfloor, walls, and plumbing lines for signs of water damage, mold, or corrosion. Address any issues immediately to prevent future complications.
-
Apply comprehensive waterproofing. Coat floors, walls, and transitions with a high-quality waterproof membrane, such as liquid-applied systems or sheet liners. This layer forms the foundation of the wet room, protecting against moisture penetration.
-
Engineer the floor slope. Install sloped flooring that directs water toward the drain, typically at a rate of one-quarter inch per foot. Use pre-sloped pan systems or custom mortar beds to ensure even drainage without visible puddles.
-
Select and install tiles. Opt for large-format, slip-resistant porcelain or ceramic tiles suitable for wet environments. Apply thinset mortar evenly, then grout with waterproof silicone or epoxy to seal all joints effectively.
-
Incorporate containment elements. Position frameless glass panels or screens to minimize water splash beyond the shower area while preserving the open aesthetic. Ensure panels are tempered for safety and ease of cleaning.
-
Integrate fixtures and accessories. Mount a rainfall showerhead, handheld sprayer, and built-in niches for toiletries. Add a fold-down bench or shelf to enhance usability, particularly for users with limited mobility.
A skilled team completes most conversions in five to seven active days, with additional time for curing materials. This structured approach minimizes disruptions and maximizes the longevity of the installation.
Project Timeline and Complexity Considerations
The full conversion process spans one to two weeks, accounting for preparation, execution, and final touches. Demolition and waterproofing occupy the initial days, followed by tiling and fixture installation. Allow buffer time for material drying, such as 24 to 48 hours for grout and sealants.
Attempting a DIY project introduces substantial risks, including improper sloping that leads to water pooling or membrane failures causing structural damage. Professional expertise guarantees adherence to local building codes, which often mandate specific waterproofing standards and accessibility provisions. Hiring certified contractors also provides warranties, offering peace of mind against potential defects.
Comprehensive Tools and Materials List
Gather these essentials before starting to streamline the process:
- Demolition equipment: pry bar, utility knife, and reciprocating saw for safe removal.
- Waterproofing supplies: liquid membrane, bonding adhesive, and seam tape.
- Drainage components: linear or point drain kit with integrated slope boards.
- Tiling tools: wet saw or tile cutter, notched trowels, and spacers.
- Surface materials: non-slip floor tiles, matching wall tiles, and backer board.
- Sealing products: silicone caulk and epoxy grout for durable joints.
- Plumbing and enclosure items: shower valve, head, glass panels, and hardware.
Conduct a thorough flood test by plugging the drain and running water for several hours. Verify no leaks emerge before proceeding with final enclosure.
Adapting to Regional and Environmental Factors
Climate influences wet room design significantly. In colder areas, incorporate radiant floor heating or insulated underlayments beneath the membrane to maintain comfort and prevent condensation. Humid regions benefit from powerful exhaust fans with humidity sensors to control moisture levels and inhibit mold growth.
Local regulations vary; many municipalities require permits for plumbing alterations or full waterproofing conversions. Verify requirements through your city's building department to avoid fines or rework. For coastal or flood-prone zones, elevate drains slightly and use enhanced sealing to withstand environmental stresses.
Enhancing Home Value Through Wet Room Installation
Wet rooms appeal to contemporary buyers who prioritize open, barrier-free designs that facilitate aging in place. The absence of curbs improves accessibility for wheelchairs and reduces fall risks, aligning with universal design principles. While some hesitate over tub removal, data from real estate professionals indicates that luxury shower features in homes with secondary bathing options command premium prices.
In midrange and upscale markets, listings with wet rooms differentiate themselves, often accelerating sales and justifying 5 to 10 percent higher valuations. The modern aesthetic, combined with low-maintenance surfaces, positions the upgrade as a smart investment for long-term equity growth.
Strategies for Optimal Wet Room Performance
Achieve a flawless outcome by focusing on subtlety and functionality. Maintain a precise slope to guide water efficiently without creating uneven walking surfaces. Light-toned tiles and minimalistic patterns amplify the sense of space, ideal for compact bathrooms.
Incorporate practical elements like integrated storage and adjustable lighting to elevate user experience. Select all components, from fixtures to electrical outlets, with IP-rated waterproofing for safety. Prioritize robust ventilation systems, including inline fans, to sustain air quality and surface integrity over time.
This upgrade suits diverse bathroom sizes, transforming even modest spaces into inviting retreats. Thoughtful execution yields a resilient, stylish environment that endures daily use while contributing to home enhancement.
Frequently Asked Questions
What is the average return on investment for a wet room? Studies suggest a 60 to 70 percent ROI, particularly in urban areas where modern amenities drive buyer interest.
Can wet rooms accommodate families with children? Yes, with adjustable shower heights and non-slip surfaces; pair with a separate tub in another bathroom for versatility.
How do I maintain a wet room? Wipe surfaces daily with mild cleaners, reseal grout annually, and run ventilation after each use to prevent buildup.
Are wet rooms suitable for historic homes? They can be, if integrated sensitively; consult preservation experts to balance modernity with architectural integrity.