Hidden Pantries: A 92% ROI Boost for Kitchen Value
Homeowners who install a hidden pantry recover up to 92% of the investment upon selling. This upgrade provides additional storage, clears countertops, and imparts a polished, upscale appearance to the kitchen. The result combines practical utility with enhanced property appeal.
Defining a Hidden Pantry
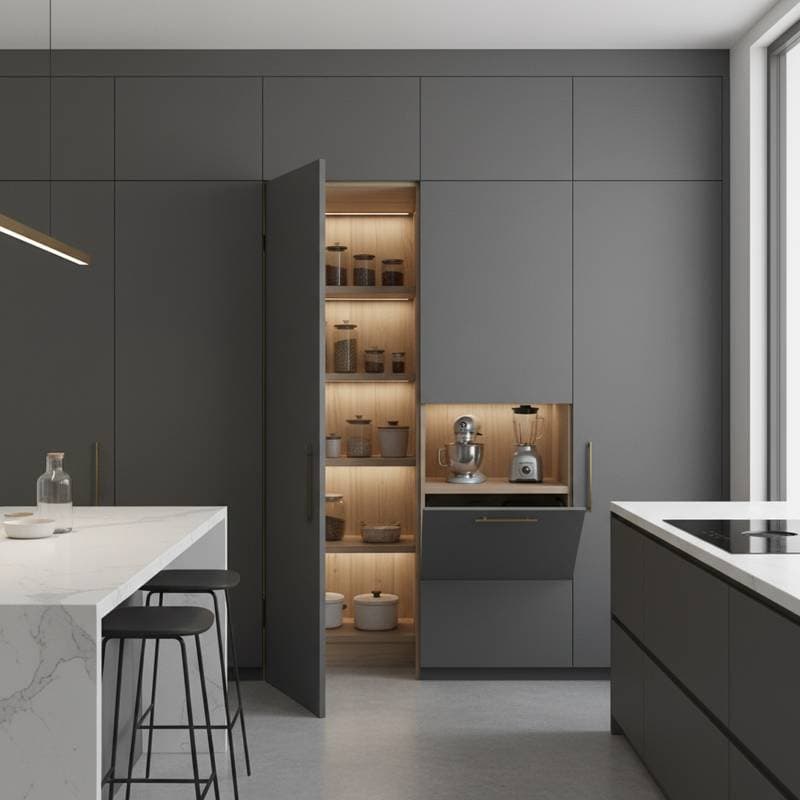
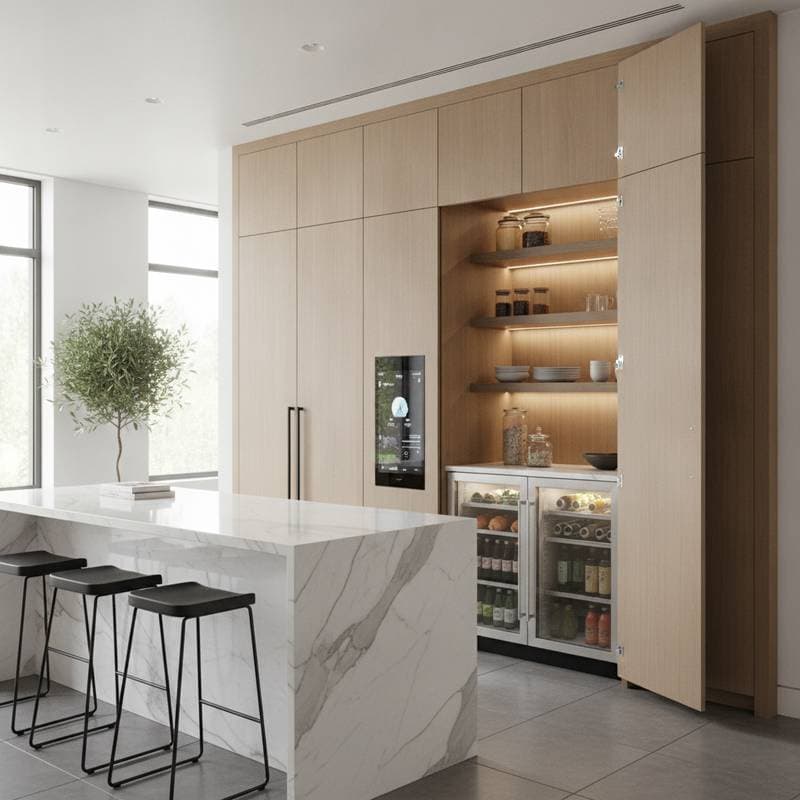
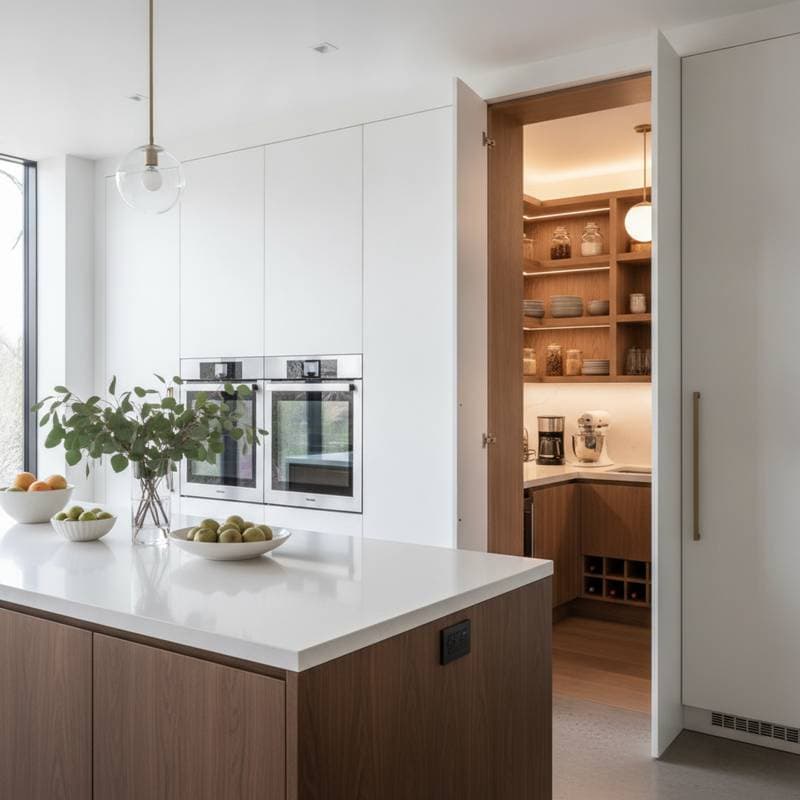
A hidden pantry functions as a discreet storage area concealed behind cabinet fronts or a seamless door that integrates with the surrounding kitchen elements. When closed, it appears as an extension of the cabinetry. The interior typically features shelving, preparation surfaces, and occasionally integrated appliances, resembling a compact butler's pantry with an unobtrusive access point.
Such spaces accommodate pantry staples, compact appliances, and household essentials. Advanced versions incorporate elements like secondary sinks, built-in ovens, or dedicated beverage stations. The primary purpose remains to maintain a streamlined kitchen facade while managing everyday disarray.
The Value Proposition of Hidden Pantries
Prospective buyers prioritize kitchens that convey spaciousness and order. Hidden pantries eliminate visible disorganization and position storage as a deliberate design choice. Property appraisers account for the added functional square footage, while interior experts note the upscale ambiance achieved without extensive renovations.
Beyond resale benefits, these features improve routine usability. Groceries can be unpacked discreetly, meal preparation occurs in a dedicated zone, and post-meal cleanup remains out of sight. They suit contemporary open-plan layouts that demand concealed operational areas.
Step-by-Step Installation Guide
1. Select an Optimal Location
Identify a position adjacent to the kitchen, such as behind current cabinetry, in a corner, or at the junction of a closet and kitchen wall. Allocate a minimum of 3 feet by 5 feet to ensure practicality. Measure existing space constraints to confirm feasibility.
2. Design the Access Point
The entrance determines the concealment effectiveness. Opt for a cabinet-height door, a paneled surface matching adjacent units, or a sliding mechanism that aligns with wall planes. Prioritize visual continuity to render the portal indistinct.
3. Configure the Interior Space
Incorporate adjustable shelving, pull-out drawers, and task lighting. Install electrical receptacles for appliance use. Consider adding a countertop for food prep or a utility sink, provided plumbing access permits.
4. Address Permits and Regulations
Structural modifications involving plumbing or electricity require local permits. Review building codes for requirements on airflow, illumination, and receptacle placement. Adhere to all standards to prevent future compliance challenges.
5. Construct and Refine
Proceed with framing, drywall installation, cabinet assembly, and finishing touches. Align materials and trim with the primary kitchen for uniformity. Integrate automatic lighting or touch-activated switches for user-friendly operation.
6. Verify Functionality and Organize
Assess door operation, illumination levels, and accessibility before full use. Arrange contents logically: position heavy items at lower levels, frequently accessed goods at mid-height, and lightweight objects overhead.
Cost Breakdown
| Task | Typical Cost Range | Influencing Factors |
|---|---|---|
| Basic Construction | $3,500–$7,000 | Dimensions, material choices, finish quality |
| Custom Cabinetry and Access | $4,000–$9,000 | Detailing level, hardware durability |
| Electrical and Lighting | $500–$1,500 | Number of outlets, fixture types, wiring complexity |
| Plumbing for Sink (Optional) | $1,000–$2,500 | Proximity to main lines |
| Premium Full Build | $10,000–$20,000+ | Luxury elements like custom millwork or integrated appliances |
Regional variations apply; urban labor rates exceed those in rural settings. Selecting prefabricated cabinets reduces expenses by approximately 25% compared to bespoke options.
Calculating Return on Investment
Hidden pantries stand out as high-yield kitchen enhancements, with industry data indicating an average 92% ROI. An $8,000 expenditure might translate to $7,360 in added home equity. Properties featuring integrated storage often attract quicker offers, as they project sophistication and efficiency.
Factors elevating ROI include stylistic harmony with the kitchen, quality mid-tier materials, convenient placement, and proper illumination plus airflow. Conversely, diminished returns arise from confined layouts, discordant entry designs, or excessive encroachment on primary kitchen area.
Project Timeline
Basic installations using standard components require 1 to 2 weeks total. Incorporating custom elements or utilities extends this to 3 to 5 weeks. Actual construction occupies less than half the schedule; delays typically stem from planning, procurement, or approvals.
Accelerate progress by settling on specifications prior to any disassembly, sourcing supplies in advance, and minimizing deviations from current infrastructure.
DIY or Professional Approach
Pursue DIY When
Basic carpentry skills suffice, an underutilized space like a closet exists, and no utilities demand addition.
Engage Professionals For
Framing alterations, precise door integration, or utility installations.
Experts excel in precision alignment, regulatory adherence, and superior aesthetics. Licensed specialists manage electrical and plumbing tasks as mandated by most jurisdictions.
Essential Tools and Materials
Tools
- Stud finder
- Level
- Drill and screwdriver set
- Circular saw
- Measuring tape
- Painting equipment
- Electrical tester
Materials
- Lumber for framing
- Drywall panels and fasteners
- Cabinet doors or panels
- Hinge or track systems
- Shelving components
- LED lighting fixtures
- Matching trim and finishes
Select damp-resistant options for areas near moisture sources. Coordinate aesthetics with the main kitchen to achieve cohesion.
Varied Design Configurations
Access Door Variations
- Full cabinet door: Integrates seamlessly with linear cabinet arrangements.
- Wall-flush panel: Suits sleek, modern aesthetics through color matching.
- Pocket slider: Conserves swing space, requiring adequate wall depth.
- Decorative overlay: Incorporates mirrors or artwork for dual purpose.
Internal Arrangements
- Pure storage: Focuses on shelving for provisions and devices.
- Preparation zone: Adds surfaces, power, and lights for minor tasks.
- Entertaining station: Includes sinks, dishwashers, or cooling units.
Simpler storage models prove most economical and straightforward to implement, while advanced setups demand greater resources.
Compliance and Safety Essentials
Scan for concealed utilities prior to wall alterations. Install ground-fault circuit interrupters near water features. Employ fire-resistant materials in applicable zones. Ensure adequate air circulation to mitigate dampness and preserve contents. Prohibit storage of combustibles adjacent to electrical components.
Bypassing approvals risks policy invalidation and resale hurdles. Verify adherence before enclosing spaces.
Adapting to Local Conditions
In high-humidity zones, incorporate vapor barriers and exhaust systems. Position units on interior walls in cooler climates to prevent pipe issues. In fire-prone regions, seal vents against external elements. Consult municipal guidelines for specific illumination or spacing mandates.
Urban regulations often equate these spaces to standard kitchen extensions, potentially imposing extra access or lighting stipulations.
Integration Best Practices
Replicate cabinetry colors and fittings precisely to minimize visibility. Align panel edges with neighboring structures. Extend molding continuously across the entry. Install interior illumination beneath shelves for enhanced visibility. Choose subdued surfaces to reduce reflections and marks.
These refinements ensure the feature appears as an original design element, often evading detection by visitors.
Determining Appropriate Dimensions
Aim for a minimum of 15 square feet for viability. Ideal ranges span 20 to 40 square feet, accommodating pathways, storage, and work areas. In constrained spots, maximize height with tall shelving and access aids. Larger formats support counters or device enclosures without compromising the core kitchen.
Balance expansion against potential reduction in main-area usability.
Hidden Pantries Versus Open Shelving
| Aspect | Hidden Pantry | Open Shelving |
|---|---|---|
| Aesthetic Effect | Streamlined and orderly | Visible and ornamental |
| Capacity | Substantial | Constrained |
| Upkeep | Minimal | Frequent cleaning |
| Expense | Moderate to elevated | Budget-friendly |
| Market Draw | Consistent appeal | Variable preferences |
Hidden solutions attract order-focused buyers, aligning with minimalist trends. Exposed options complement informal styles but risk perceived chaos. For value retention, concealed designs prevail.
Scenarios Requiring Expert Input
Seek contractors for load-bearing modifications, bespoke matching, infrastructure rerouting, or regulatory uncertainties. Specialized trades handle distinct aspects efficiently, averting errors and ensuring legality.
Sustaining the Upgrade
Post-installation, employ transparent containers and labeling for quick retrieval. Install hooks for utensils and mobility aids. Provide surge-protected strips for devices. Routinely inspect fixtures and wiring.
Consistent maintenance preserves efficiency and equity. During sales, showcase the feature through strategic imagery to underscore lifestyle enhancements.
Frequently Asked Questions
What budget should one anticipate for a hidden pantry?
Expect $5,000 to $10,000, influenced by scale, detailing, and site specifics.
Are permits necessary?
Yes for utility additions; storage conversions often exempt, but local verification applies.
Is converting a closet viable?
Absolutely; it simplifies the process to door replacement and interior outfitting.