Replacing Tubs with Wet Rooms: An 11 Percent Value Increase by 2026
The decision to replace a traditional bathtub with a wet room can increase a home's value by approximately 11 percent by 2026. Homebuyers increasingly seek modern, accessible bathroom designs, and wet rooms deliver exactly that combination. These installations provide a premium appearance, expanded spatial perception, and straightforward cleaning routines.
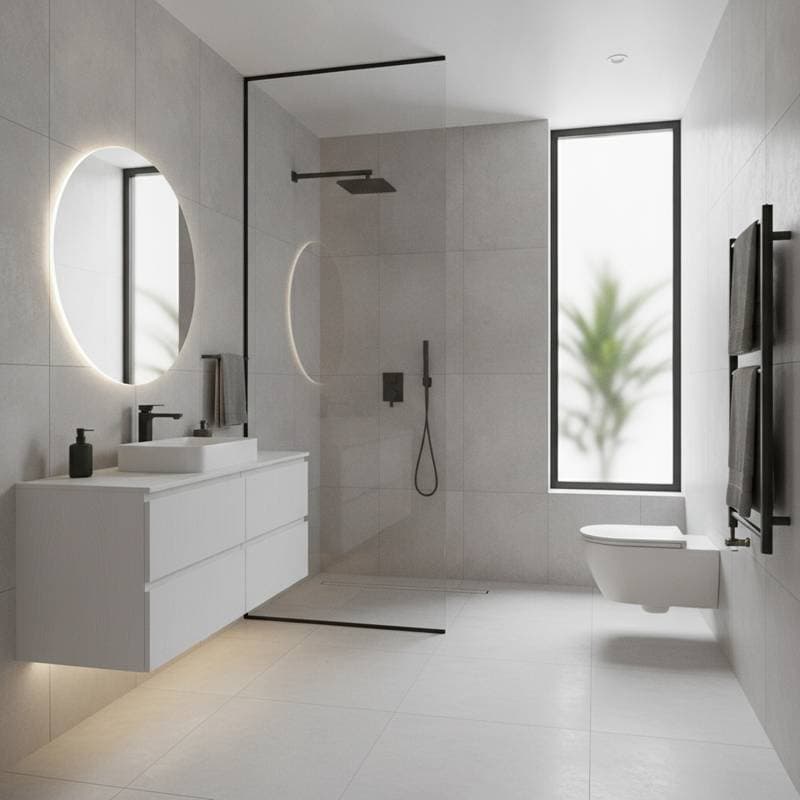
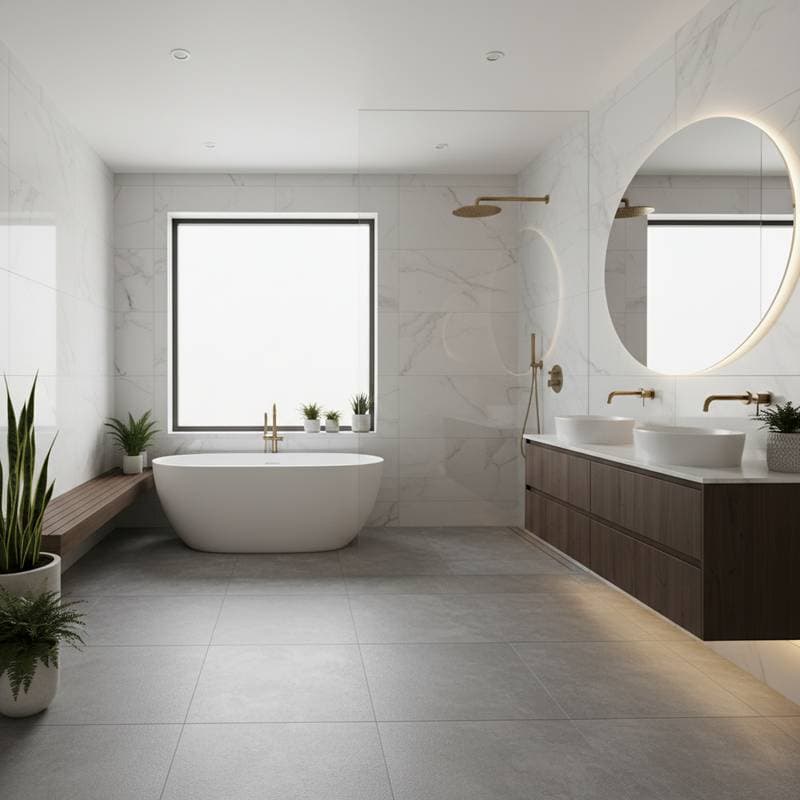
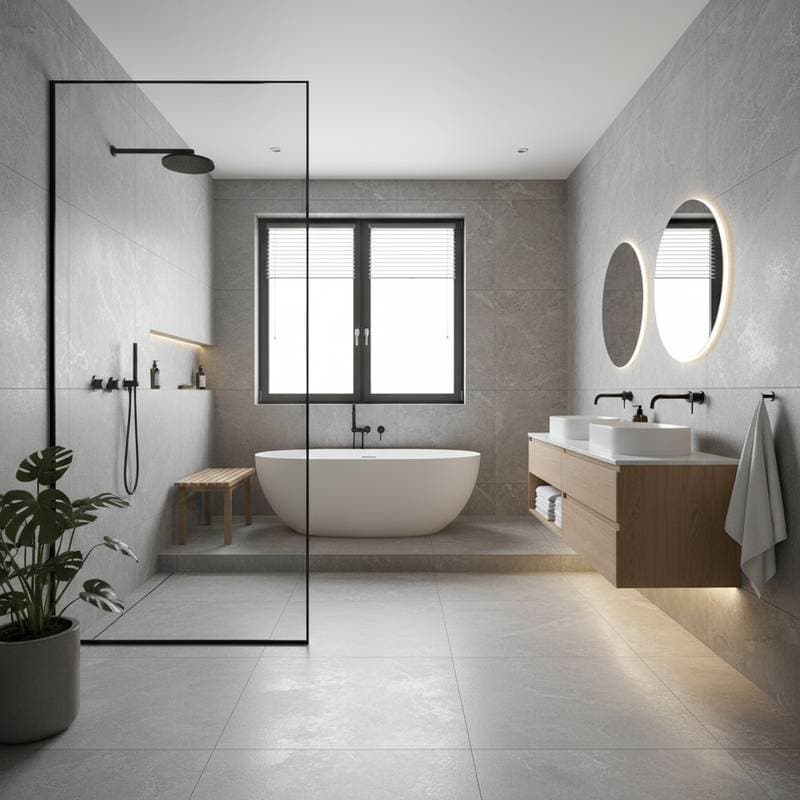
A wet room features a completely waterproofed bathroom space with an open shower zone and no enclosed tub. Water flows directly to a floor-mounted drain, creating a streamlined, resort-inspired aesthetic. This approach suits compact areas, accommodates aging-in-place requirements, and introduces an element of sophistication in a single renovation effort.
Conversion Process from Tub to Wet Room
1. Layout Planning
Measure the bathroom dimensions precisely and designate the shower zone location. Account for a gentle floor gradient directing water to the drain. Maintain a minimum of two feet of clear pathway between all fixtures to ensure usability.
2. Tub Removal
Shut off the water supply at the main valve. Disconnect the faucet assembly, drain components, and tub enclosure. Sever the tub connections to wall studs and extract the unit with care. Inspect underlying areas for signs of water damage or structural issues.
3. Waterproofing Application
Apply a waterproof membrane across the subfloor and extend it up the walls to a height of at least six feet. Secure all seams with specialized waterproof tape. This layer forms a critical barrier against moisture intrusion and subsequent mold growth.
4. Drain Installation and Floor Sloping
Position a linear or point drain prior to installing tile backer board. Achieve a slope of one-quarter inch per linear foot toward the drain. Conduct a water test to verify drainage efficiency before proceeding to tile installation.
5. Surface Tiling
Select porcelain or natural stone tiles certified for slip resistance and wet environments. Tile the walls first, followed by the floor. Apply epoxy grout to create a durable, impermeable seal.
6. Fixture Installation
Secure the shower control valve, rain showerhead, and handheld wand. Incorporate a glass enclosure if preferred, although fully open configurations remain popular for their unobstructed feel.
7. Lighting and Ventilation Completion
Install illumination fixtures rated for high-humidity conditions and a low-noise exhaust system. Effective airflow management maintains dryness and inhibits mildew development.
Project Timeline
A standard conversion from tub to wet room requires 5 to 10 days overall. Hands-on labor typically spans 3 to 6 days, interspersed with necessary drying periods.
Elements that Extend Duration:
- Subfloor repairs or adjustments for levelness
- Plumbing line modifications
- Intricate tile patterns
- Required permit reviews
With thorough preparation, a professional completes the work in under two weeks, minimizing disruption to bathroom functionality.
Essential Tools and Materials
Tools
- Tile cutting saw
- Spirit level
- Trowel assortment
- Waterproofing applicator roller
- Power drill with appropriate bits
- Utility cutting knife
- Caulking applicator gun
- Notched adhesive spreader
Materials
- Waterproof membrane system and sealing tape
- Cement tile backer board
- Thin-set mortar adhesive
- Slip-resistant floor and wall tiles
- Epoxy-based grout
- Complete drain assembly kit
- Shower control valve and heads
- Silicone sealant and caulk
Invest in high-quality waterproofing products. Inferior membranes degrade quickly, leading to concealed leaks and costly repairs.
Cost Analysis
Factors Increasing Expenses
- Oversized or premium natural stone tiles
- Bespoke glass partitions
- Integrated underfloor heating systems
- Luxury-grade plumbing fixtures
- Extensive plumbing relocations
Strategies for Cost Control
- Standard porcelain tile selections
- Retention of original drain positions
- Open designs with limited glass elements
- Self-performed demolition tasks
Balanced Approach
Opt for mid-tier porcelain tiles, preserve the existing drain location, and engage professionals solely for waterproofing and tiling phases. This method achieves an upscale result within reasonable financial limits.
Regional and Climate Considerations
- Colder Climates: Incorporate radiant floor heating to enhance comfort and accelerate moisture evaporation.
- Humid Environments: Install a high-capacity exhaust fan and mold-resistant grout formulations.
- Coastal Locations: Choose corrosion-resistant fixtures in stainless steel or brass.
- High-Altitude or Freezing Areas: Verify that subfloor insulation complies with local building regulations.
In moisture-prone regions, conduct annual examinations of grout lines and seals. Minor fissures expand rapidly under persistent humidity.
Professional Assistance Indicators
Engage a certified bathroom renovation specialist when:
- Subfloor decay or mold presence is detected.
- Drain or ventilation rerouting becomes necessary.
- Uncertainty arises regarding slope calculations.
- Radiant heating integration is desired.
- The property enters the market soon, requiring documented assurances.
Professionals handle waterproofing certifications and approvals, which certain municipalities mandate prior to final surfacing.
Pitfalls to Sidestep
- Neglecting Slope Validation: Test with water prior to tiling. Standing water signals the need for adjustments.
- Standard Grout Selection: Epoxy varieties provide the essential permanent water barrier.
- Ventilation Oversight: Accumulated steam damages adjacent drywall and finishes.
- Glossy Tile Choices: Polished surfaces become hazardous when wet; matte options ensure safety.
- Fixture Overplacement: Allocate at least 30 inches of clearance within the shower zone.
Meticulous preparation averts significant rework and expenses.
Daily Use and Upkeep
Maintenance proves effortless post-installation. Wipe down the floor with a squeegee after each shower, clear debris from drains regularly, and inspect grout monthly for wear. A diluted vinegar solution preserves tile clarity without harsh chemicals.
Wet rooms excel in compact residences, secondary bathrooms, or primary suites. The seamless design visually amplifies space, doubling the perceived area of modest layouts.
Future renovations benefit from the enduring waterproof foundation, allowing surface refreshes without structural overhauls.
Expert Recommendations
- Verify drain functionality before tiling commences to avoid later complications.
- Employ a pre-formed sloped shower pan for beginners in tiling applications.
- Extend waterproofing coverage one foot beyond the intended shower boundaries.
- Retain an extra set of matching tiles for potential future mends.
- Apply silicone sealant around all fixture perimeters rather than grout.
Proper construction ensures a wet room endures for decades, yielding returns in usability and property appreciation.
Frequently Asked Questions
Do wet rooms enhance value across all properties?
In the majority of markets, they elevate worth, particularly in metropolitan and luxury segments where contemporary bathrooms command premiums.
Are wet rooms suitable for children or seniors?
They offer safety with slip-proof tiles and optional support rails.
Is upstairs installation feasible for a wet room?
It requires expert waterproofing and potential subfloor strengthening.
Does a shower enclosure remain essential?
Not necessarily; open layouts prevail, though partial panels manage water spray effectively.
Achieving Lasting Results
A wet room delivers ongoing enjoyment alongside tangible financial gains. It evokes a personal retreat, simplifies routines, and adapts to diverse lifestyles.
Approach the project with detailed planning, prioritize robust waterproofing, and select finishes aligned with personal preferences. Whether undertaking the work independently or with expert support, a meticulously executed wet room elevates an outdated bathroom into a compelling asset.